When you enable DHCP, you normally get both an IP address and DNS servers from the DHCP server. Sometimes, however, you don’t want those DNS servers because using random DNS servers can open you to DNS poisoning. One way of being more secure is to hardcode to the Google public DNS servers. This works great in most cases, except on some hotel WIFI access points where they are actually using DNS poisoning to redirect you to their “we accept the usage rules” webpage. Here’s how to proceed.
- Setup Google DNS servers in Network Settings:
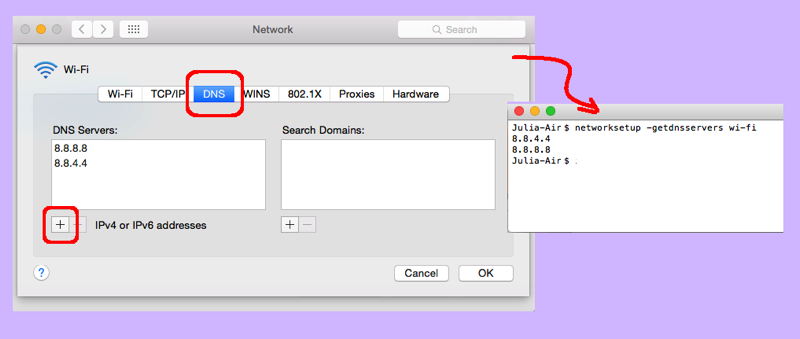
- Open System Preferences
- Click the Network icon
- Highlight your network card on the left (mine is “Wi-FI”)
- Click the Advanced button
- Select the DNS tab
- Click the plus button and add server 8.8.8.8
- Click the plus button and add server 8.8.4.4
- Click the OK button
- To validate your DNS settings:
- Open a terminal window
- Networksetup -getdnsservers wi-fi
- To remove Hardcoded DNS servers:
- Open System Preferences
- Click the Network icon
- Highlight your network card on the left (mine is “Wi-FI”)
- Click the Advanced button
- Select the DNS tan
- Highlight 8.8.8.8 and click the minus button
- Highlight 8.8.4.4 and click the minus button
- Click the OK button
Isn’t it lovely when a vulnerability is being used as a “feature”? In any case, I’m constantly setting and re-setting the DNS server under Network settings. Remember that if you are using Apple’s native ability to create VPN connections, there are DNS settings in those network settings, too. So, even if your WIFI is hard-coded, you could be using someone else’s DNS servers when attaching via Ethernet or via VPN.