I got a call from one of my friends who was all excited because they had purchased a new Apple MacBook. And, they asked me to recommend an encrypted thumb drive (aka flash drive) that would be compatible with their laptop. Well, I explained there are thumb drives with hardware encryption, but for most of us just using the operating systems’s native encryption capabilities is sufficient and less expensive. Here’s how to do this, which works on both flash drives and USB external drives.
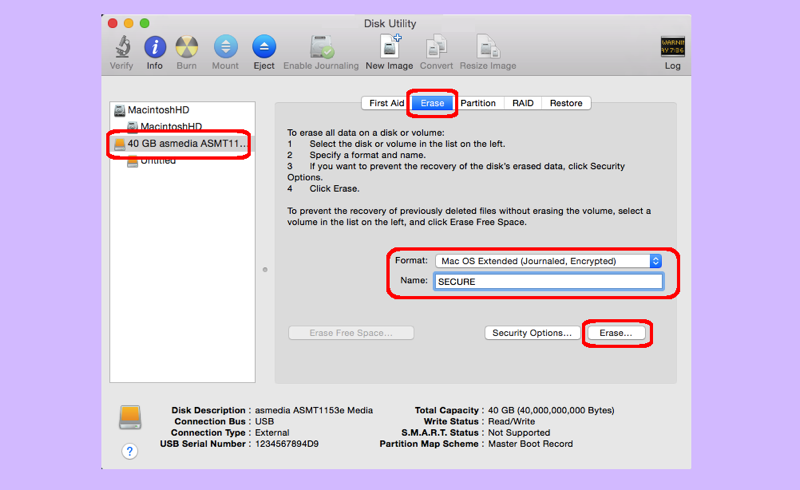
- Open Disk Utility:
- Open Finder
- Navigate to Applications | Utilities | Disk Utility
- Run Disk Utility
- Highlight the Dive:
- Plug in the USB drive you want to encrypt
- Be certain any data you want has been copied off (use Finder) because the next steps destroy data!
- Notice that all your drives appear in Disk Utility… highlight the one you want to encrypt
- Encrypt the Drive:
- Select the Erase tab
- From the Format dropdown, choose “Max OS Extended (Journaled, Encrypted)
- Name your USB something you will recognize
- Click the Erase button
- Pick a Password:
- You will be prompted to select a password and hint
- Enter a complex password that you will remember
Now, obviously, if you start encrypting your drives with different passwords, and you have a lot of drives, you can end up confused and locking yourself from your data. I would recommend you use a password safe to manage passwords to help prevent this possibility. Also, make the hint something that will help you jog your memory without necessarily making it possible for others (especially family and friends who know you well) to guess the password. Frankly, just formatting the drive as “Mac OS Extended” even if you fail to encrypt the drive adds a little bit of obscurity since Microsoft Windows won’t natively read this file format. But, I recommend you encrypt all external drives, in case you misplace them.
