Yesterday, we discussed how to upgrade an ESXi 5.1 host to ESXi 5.5 GA, and also why to avoid using ESXi 5.5U1. Today, let’s see how to setup the heartbleed Update Manager baseline so that we patch the vulnerable ESXI 5.5 GA host for the heartbleed vulnerability. This guide assumes you have vCenter and the Update Manager plugin installed. It also assumes you are using the iSphere client, because the web client does not have Update Manager integrated yet.
- Download the patches:
- Login to the vSphere client
- Navigate to Home | Update Manager
- Goto the Configuration tab
- Under Settings, click “Download Settings”
- Click the “Download Now” button
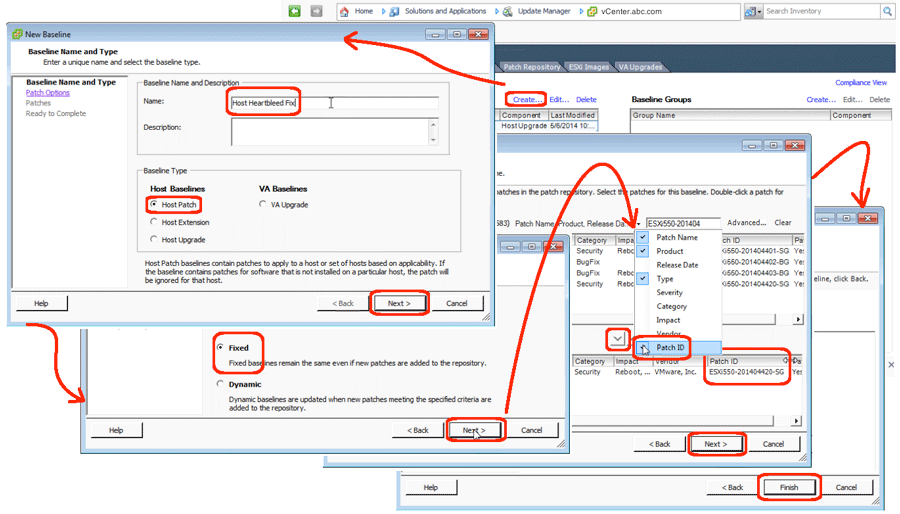
- Start the “New Baseline” wizard:
- Goto the “Baselines and Groups” tab
- Click the Create hypherlink
- Name your baseline “Host Heartbleed Fix”
- Check the “Host Patch” checkbox
- Click the Next button
- Complete creation of the new baseline:
- Select the Fixed radio button and click the Next button
- Click the drop down icon and enable “Patch ID” in the search settings
- Enter “ESXi550-201404” in the search field and click Enter
- Highlight the “ESXi550-201404420” patch and click the down arrow button
- Click the Next button
- Click the Finish button
Now, you should be able to see the new fixed baseline you created in Compliance view. As we will see tomorrow, you will also be able to attach this baseline to hosts, and apply the resulting remediation.