So, we have this large monitor that we call a television. It hardly gets used and I was hoping to change that by making it more capable. I wanted to be able to display my laptop screen on the television, so I purchased the Google ChromeCast. The price point of $35 was reasonable. To get your own, go here: Chromecast on Amazon.
Hardware setup is trivial. These are the steps:
- Unpack the unit from its shipping box
- Plug it into the HDMI port of your television
- Add a 5V power supply to its micro USB port
Software setup was a bit confusing. Basically, you need to tell the Chromecast about your local WIFI settings, so that it can accept casts. By default the chromecast is an access point and it tells you its name on bootup. In order to make the configuration changes, you will need to download and install the chromecast application from either the Google App Store (Android) or the Apple App Store (iOS).
- Locate an iOS or Android device (but not a Kindle Fire which uses the Amazon App Store)
- Download the Google chromecast application
- Install the chromecast application
- Start the chromecast application
- It will ask you to connect your gadget’s WIFI to the chromecast access point… which will be called Chromecastxxxx
- Then you will enter your WIFI information into the chromecast application
- Finally, the chromecast reboots and accesses your WIFI and it’s ready for use
So, now let’s move back to my original requirements. I wanted to cast my laptop screen. To do this, I needed to install the Chrome browser, install the Chromecast browser extension, and then attempt the casting.
- Download Chrome from the following website: https://www.google.com/intl/en/chrome/browser/
- Install Chrome, or if you already have it, validate that it’s updated by entering the “About Google Chrome” menu item
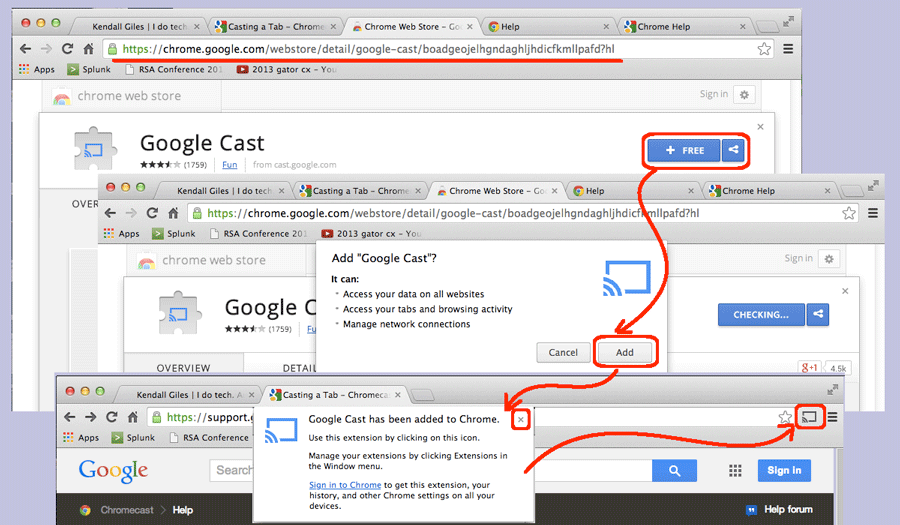
- Download and install the chromecast extension from here: https://chrome.google.com/webstore/…
(Note: the screen shots above show the extension being installed)
Once that was done, I was able cast from my laptop. Here were those steps:
- To cast the chrome tab: click the casting icon (top right icon of browser) and select the chromecast hostname
(Note: if you have more than one chromecast in the house, you must name them uniquely, and you will see all of them in the list) - To cast the entire laptop screen: click the casting icon, click the small grey drop down in the resulting dialog, select “cast entire screen”, then select the chromecast hostname
(Note: if you are already casting, you need to stop casting before you cast the entire screen, because it won’t toggle)
So, the process worked fairly well. There were several gotchas that I would like to mention. First, the screen casting capability works only if you disable the “Block all incoming connections” OSX firewall setting. In fact, I had the best luck just disabling the firewall altogether. Once a casting started, I could re-enable the firewall and the casting continued to work. Second, the display is mirroring whatever is on your screen, so it’s not the same as having an extra external screen. Third, your results will vary depending upon the quality of your television display — you need a HDTV for this to be truly beneficial.