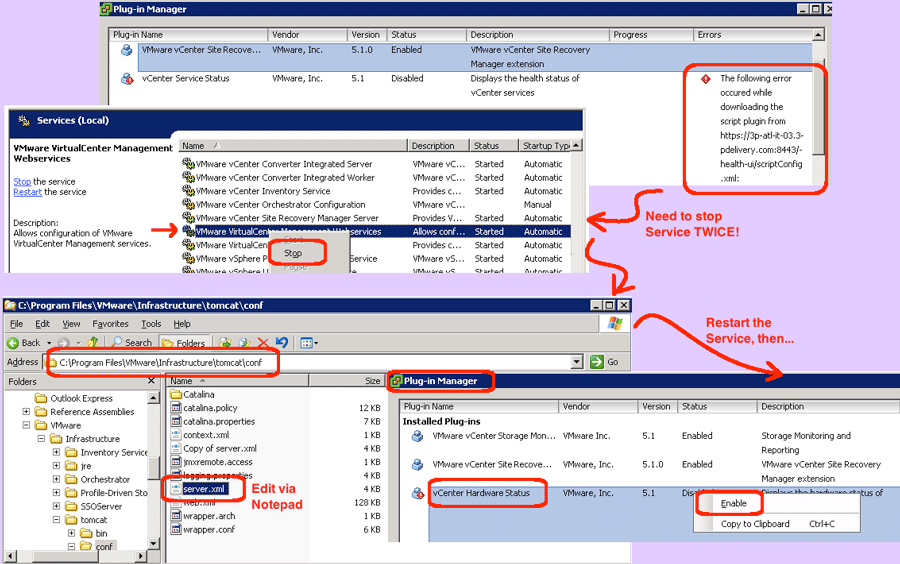
Today, I was helping a new customer with their VMware 5.1 vCenter server. When I looked in the Plug-Ins menu | Manage Plug-ins… menu item, I noticed that two plugins were reporting errors. The plugins effected were “vCenter Service Status” and “vCenter Hardware Status”. Both were reporting “The following error occurred while downloading the script plugin… The client could not send a complete request to the server.” The services were all started, what could be wrong?
I googled and found this VMware article which correctly indicates the issue is with the VMware VirtualCenter Management WebServices, but incorrectly gives a resolution that cannot be implemented because the “Connector port” keyword cannot be located in the server.xml file. I am unsure why my server.xml was different, maybe because this was an upgraded server?
http://kb.vmware.com/selfservice/microsites/search.do?language=en_US&cmd=displayKC&externalId=1013472
Instead, this is how I resolved the error:
- Stop the service:
- Open Control Panel | Administrative Tools | Services
- Scroll down to “VMware VirtualCenter Management WebServices”
- Right-click and select the Stop menu item
- Wait for an error message…
- Right-click and select the Stop menu item
(Note: you must stop the same service twice. This works great.)
- Edit the server.xml file:
- Open File Manager (e.g. double-click the Start menu and select Explore)
- Navigate to c:\Program Files\VMware\Infrastructure\tomcat\conf
(Note: if you cannot locate the directory, look to see if someone installed vCenter on another drive letter.) - Copy the file called “server.xml” to create a backup of the original
- Edit the file called “server.xml” with Notepad
- Replace one line in the file:
- Find the line that begins with “Connector SSLEnabled=”
- Remove that line and replace it with the following:
<Connector SSLEnabled=”true” acceptCount=”100″ ciphers=”SSL_RSA_WITH_RC4_128_MD5, SSL_RSA_WITH_RC4_128_SHA, TLS_ECDHE_ECDSA_WITH_AES_256_CBC_SHA, TLS_ECDHE_RSA_WITH_AES_256_CBC_SHA, TLS_ECDH_ECDSA_WITH_AES_256_CBC_SHA, TLS_ECDH_RSA_WITH_AES_256_CBC_SHA, TLS_DHE_RSA_WITH_AES_256_CBC_SHA, TLS_DHE_DSS_WITH_AES_256_CBC_SHA, TLS_DH_RSA_WITH_AES_256_CBC_SHA, TLS_DH_DSS_WITH_AES_256_CBC_SHA, TLS_RSA_WITH_AES_256_CBC_SHA, TLS_DHE_RSA_WITH_AES_128_CBC_SHA, TLS_RSA_WITH_AES_128_CBC_SHA, TLS_DHE_DSS_WITH_AES_128_CBC_SHA, TLS_DH_RSA_WITH_AES_128_CBC_SHA, TLS_DH_DSS_WITH_AES_128_CBC_SHA, SSL_RSA_WITH_3DES_EDE_CBC_SHA, SSL_DHE_RSA_WITH_3DES_EDE_CBC_SHA, SSL_DHE_DSS_WITH_3DES_EDE_CBC_SHA” connectionTimeout=”20000″ executor=”tomcatThreadPool” keystoreFile=”${bio-vmssl.keyFile.name}” keystorePass=”${bio-vmssl.SSL.password}” keystoreType=”PKCS12″ maxKeepAliveRequests=”15″ port=”${bio-vmssl.https.port}” protocol=”HTTP/1.1″ redirectPort=”${bio-vmssl.https.port}” scheme=”https” secure=”true”></Connector>
- Start the services:
- Open Control Panel | Administrative Tools | Services
- Scroll down to “VMware VirtualCenter Management WebServices”
- Right-click and select the Start menu item
- Enable the plugins:
- Login to the vSphere client
- From the Plug-ins menu | Manage Plug-ins menu item
- Right-click “vCenter Service Status” and select Enable
- Right-click “vCenter Hardware Status” and select Enable
That should resolve the issues permanently. Remember that if you have a disaster recovery instance of vCenter, to also make the same changes there. You do not need to reboot vCenter for these changes to be effective.