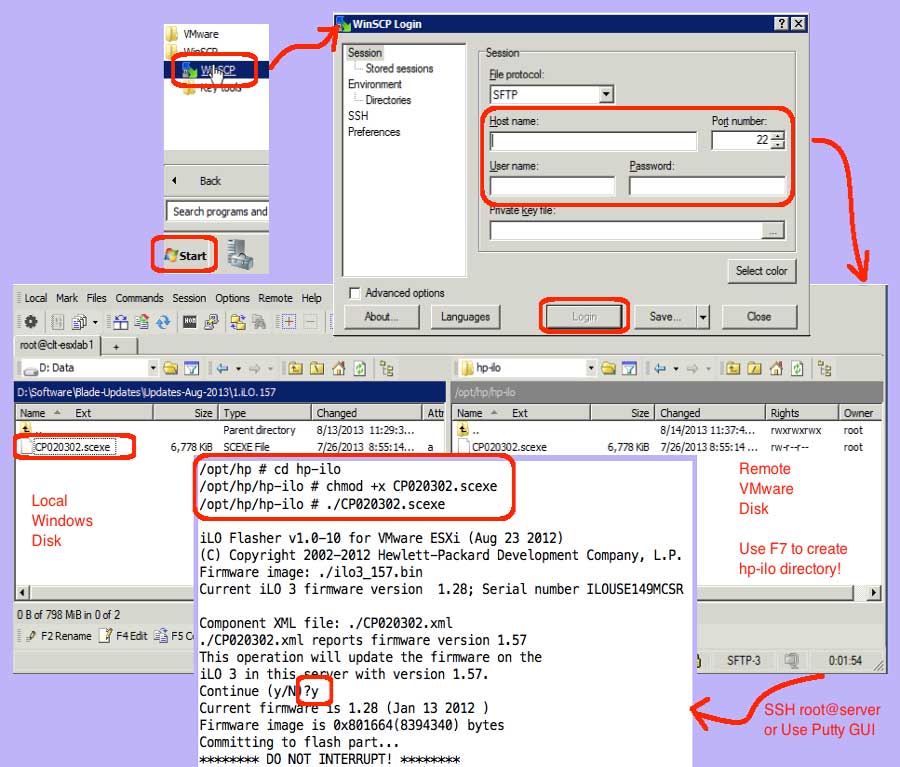
Today, I needed to upgrade HP’s Integrated Lights Out (iLO) management software. The servers I needed for upgrading iLO were running VMware 5.1 and sitting in HP’s c7000 chassis. I wanted to proceed with a rolling upgrade, where I put a server into maintenance mode, upgraded it, and then placed it back into production. Here’s the method I used to proceed, which included using WinSCP to copy the new iLO package to the VMware host.
- Download the iLO package to a Windows machine:
- Surf to the www.hp.com website, then click “Support and Drivers”
- Enter your server model number, for instance bl460c g7
- Click your operating system, for instance VMware 5.1
- Scroll down to “Firmware – Lights-Out Management” and click “Obtain Software”
- Download and install WinSCP:
- Surf to http://sourceforge.net/projects/winscp/
- Download the setup program
- Run the setup program on your Windows machine
(Note: obviously the machine you select must have network access to the VMware hosts)
- Login via WinSCP:
- On Windows, Start | Programs | WinSCP | WinSCP
- Enter the host name (or IP), the host user name (root), and the host password
- Click the Login button
- Accept the self-signed certificate, if it prompts you
(Note: you must have SSH enabled on the host. To see how goto https://www.orionscache.com/2013/01/enabling-ssh-in-vmware-via-the-isphere-client/)
- Copy the iLO package from Windows to VMware:
- In the left pane, navigate to where you saved the downloaded file in Windows
- In the right pane, navigate to
/opt/hp - Still in right pane, click F7
- Name the new folder hp-ill
- Click “Set permissions” and give it “777” by enabling all the R, W, and X checkboxes
- Click the OK button
- Double-click the new directory to enter it
- Drag the iLO package (mine was called CP020302.exe) to the new directory
- Close the WinSCP session:
- If you have multiple servers, like I did, you can the Session menu | Disconnect menu item
- Then, repeats steps 3-4 for each server
- Once you have copied to your last server, click the red X to close the session and terminate application
- Put the server in maintenance mode:
- Login to the iSphere client
- Assuming you have your servers in an HA cluster, right click the server and select the “Enter Maintenance Mode” menu item
(Note: if DRS is enabled, this will automatically migrate virtual machines. If this does not happen, then manually migrate them.)
- Use SSH to run the update:
- Use Putty to open a SSH session to the VMware host you put into maintenance mode
(Note: Alternatively if you are using an Apple workstation, you can open a terminal window and type SSH root@server) - Enter the password when prompted
- Use Putty to open a SSH session to the VMware host you put into maintenance mode
- Run the update:
- In the SSH window, run:
cd /opt/hp/hp-ilo - In the SSH window, run:
chmod +x CP020302.scexe - In the SSH window, run:
./CP020302.scexe - Respond “y” when prompted
- Wait patiently until the flash is 100% complete and iLO reboots successfully
- In the SSH window: exit
- In the SSH window, run:
- Reboot and then exit Maintenance Mode:
- Go back to the iSphere client
- Highlight the server and select the “Reboot” menu item
- Rebooting takes longer than the iLO update, wait until the server reappears in the iSphere client
- Highlight the server and select the “Exit from Maintenance Mode” menu item
Obviously, if you manually moved virtual machines off the host, then you will need to manually move them back. But, if you have DRS enabled, just go ahead with the other servers in the same cluster, and the empty updated host will get virtual machines placed back on it, as needed. If you are picky about which virtual machines run on which VMware hosts, you need to setup DRS rules. But, that is a subject for another blog post!