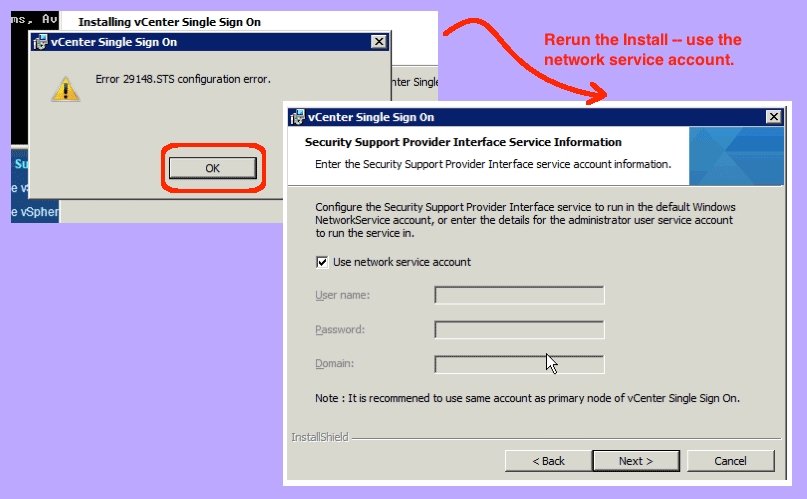
Today, I was upgrading a vCenter 5.0 server to vCenter 5.1. The first part of the upgrade process is to install the new VMware Single Sign On (SSO) service on the existing vCenter server. This part of the installation can easily happen during production times, because it does not effect access to the existing vCenter until you move to the next step (which is upgrading the inventory service). Anyway, I unexpectedly received the single sign on error message “Error 29148.STS configuration error.”
What does this mean?
The underlying issue is that the SSO installer does not correctly configure custom service credentials. So, once installed, the service is essentially unable to start itself. Further, when you click the OK button to get rid of the error dialog box, the new SSO service uninstalls itself, so there is no opportunity for you to manually resolve the error. But, I was able to re-install, and fix the error the second time.
Here are the steps to install SSO successfully:
- Run the installer:
- Download the vCenter 5.1 software from the VMware website.
- Mount the resulting ISO image to your vCenter server.
- Run autorun.exe
(Note: I have autorun disabled, but in some servers it might run automatically.)
- Accept the licensing:
- Select “vCenter Single Sign On” and click the Install button.
- Select you language, and click the OK button.
- Click the next button.
- Click the next button to the list of patents.
- Check the “I accept the terms…” checkbox and click the Next button.
- Create a primary node:
- Leave the “Create a primary node…” checkbox checked and click the Next button.
- Select “Install basic vCenter…” checkbox and click the Next button.
- Enter a password with alpha and numeric characters. WRITE THIS DOWN.
- Click the next button.
- Give database credentials.
- Install using the default SQL Express database (best and easiest).
(Note: Alternatively, if you already have a separate vCenter database, you can create an SSO schema inside it.)
- Install using the default SQL Express database (best and easiest).
- Confirm server and port settings:
- Confirm the fully qualified vCenter domain name (FQDN).
(Note: if you are not sure, open a DOS command prompt, and ping fqdn to validate that it responds.) - Click the Next button.
- Leave “use network service account” checked and click the Next button.
(Note: if you enter valid credentials, like I did at first, that’s what causes the installation error.)
- Confirm the fully qualified vCenter domain name (FQDN).
- Complete the installation:
- Validate the install location has enough disk space, and then click the Next button.
- Leave the default port and click the Next button.
- Click the Install button.
- Wait until you see “InstallShield Wizard Completed” dialog box and click the Finish button.
VMware SSO is now installed. You can open Control Panel | Administrative Tools | Services to validate that the service is running. You do not need to reboot the vCenter server to proceed to the next step in the upgrade process. However, the next step, upgrading the inventory service, will effect production. That it, it effects the availability of the vCenter server for administrative purposes. Upgrading vCenter does not affect the availability of virtual machines running on ESXi hosts.