Sometimes I need to get back to the basics to diagnose a problem. Although the telnet client is not a secure protocol, and you should be using secure shell (SSH) whenever possible, telnet is still useful when debugging SMTP issues. But, it’s missing from the default Windows 2008R2 installation. How do you install it? Do you need access to the original ISO disks?
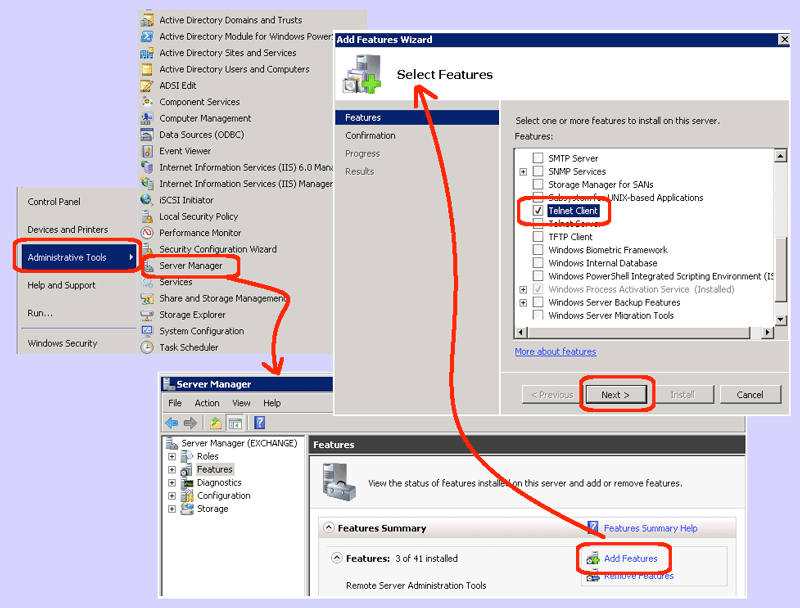
Turns out that installing telnet on Windows 2008R2 is trivial, once you know where it’s hidden. You do not need the original ISO disks. Here are the steps to take:
- Open the Service Manager:
- From the Start menu | Administrative Tools | Service Manager
(Note: if this menu is missing, open Control Panel | Administrative Tools | Service Manager)
- From the Start menu | Administrative Tools | Service Manager
- Add the telnet feature:
- Highlight the “Features” on the left pane.
- Click the “Add Features” button.
- Scroll down until you see the “Telnet Client”.
- Check the box next to the “Telnet Client” and then click the Next button.
- Click the Install button.
- Click the Close button to confirm installation as successful.
Now, if you open a DOS command line prompt, you can use telnet. For instance, to see if an Exchange server is responding to SMTP, assuming your email server happens to be named “exchange.abc.com” then type: telnet exchange.abc.com 25
Alternatively, if you are having trouble with DNS, you can use the IP address of the server, such as: telnet 10.10.10.11 25
If you are able to get a response when running locally on the server, but not when running from another server in your domain, a firewall is probably blocking the SMTP port. Check whether windows firewalls are enabled on both servers, and if those are allowing SMTP traffic, then check with your network administrator.
