I had a test web server setup to use an internally issued web certificate. It was working OK with the complete full qualified hostname. But, I also wanted it to work with the server’s IP address. What I mean by work, is I wanted the lock (in IE or any other web browser on that computer network) to show as locked and not present any aggravating SSL certificate errors. So, I had this bright idea to re-issue the certificate, using my internal CA, and include an alternative name (in this case the IP address). Once I installed this new certificate, the website stopped functioning. In fact, even returning to the old certificate, the one that previously worked, was giving me errors.
How did my steps get me into this problem? How was I supposed to resolve these steps without issuing a new certificate request (which would have solved the problem… but I was too curious to use the sledge hammer approach). I needed to recover the SSL private key that I had lost.
So, here is what I did originally, and why it worked:
- Request a certificate in IIS6:
- From Administrative Tools | Internet Information Services (IIS) Manager.
- Navigate to the website.
- Right-click the website and open the Properties dialog box.
- Goto the Directory Security tab.
- Click the “Server Certificate” button.
- Select the “Create a new certificate” radio button and click the Next button.
- Select the “Prepare the request now, but send it later” radio button and click Next.
- Click the Next button to accept the default.
- Enter organization, organizational unit, and click the Next button.
- Enter the common name — which must match the website URL you plan to use.
- Click the Next button.
- Enter country, state (all spelled out), and city.
- Click the Next button.
- Select a file location and click the Next button.
- Click the Next button and then click the Finish button.
- Use the request to generate a certificate (.cer) file.
- You can either use an internal CA or a third-party CA to generate the certificate based upon the certificate request.
- In any case, you need to have whomever you used as a trusted root certificate server in the web server’s local store.
- Save the .cer file that is generated on the web server.
- Install the new certificate in IIS6:
- From Administrative Tools | Internet Information Services (IIS) Manager.
- Navigate to the website.
- Right-click the website and open the Properties dialog box.
- Goto the Directory Security tab.
- Click the “Server Certificate” button.
- Select the “Process the pending request…” radio button and click the Next button.
- Browse to the .cer file you saved from step two, then click the Next button.
- Leave the default port 443 setting and click the Next button.
- Click the Next button and then click the Finish button.
The reason the above process works is that although the private key is not stored in the .cer file you receive from the CA, it is stored on the local web server and referenced by the open certificate request. So, when the import happens, the web server knows to associate the incoming certificate with its private key, and all is well.
But, then I tried a “short cut” and that when the web server got confused.
- Used the same certificate request (remember: its a text file and can be re-used):
- Re-generated a different certificate using the initial certificate request.
- Created a second .cer file.
- Imported the new certificate using the MMC:
- From the Run command, ran MMC.
- Use the File menu | Add/Remove Snap-in menu item.
- In the list, select Certificates and click the Add button.
- Choose “Computer account” and click the Next button.
- Select “Local computer” and click the Finish button.
- Navigate to the personal store.
- Right-click and delete the existing certificate.
- Right-click the empty results panel and click the Import menu item.
- Browse to the new .cer file and it imports successfully.
(Note: I am using the MMC here because IIS6 has the ability to select an already existing certificate.)
- Bind the new certificate in IIS6:
- From Administrative Tools | Internet Information Services (IIS) Manager.
- Navigate to the website.
- Right-click the website and open the Properties dialog box.
- Goto the Directory Security tab.
- Click the “Server Certificate” button.
- Select the “Assign an Existing Certificate” radio button and click the Next button.
- Select the certificate from the drop down list, then click the Next button.
- Leave the default port 443 setting and click the Next button.
- Click the Next button and then click the Finish button.
Now, the website fails! Oh no! Putting the old certificate “back” via the MMC does nothing to fix the problem. The underlying issue is that by (a) deleting the original certificate removed the association between the original and the private key and (b) by skipping the certificate request step never generated a new private key or any association to the existing private key. But, fixing this is trivial, when you know how.
- Fix the private key association:
- Open a DOS prompt with administrative rights.
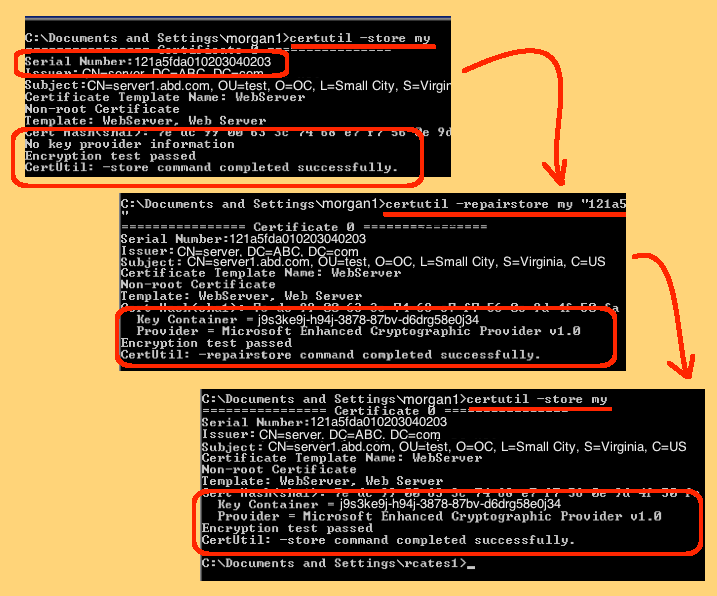
- Run the command: certutil -store my
(Note: see the sample screen shot to easily find the serial number you need.) - Copy the serial number you need from the results.
- Run the command: certutil -repairstore my “serial-number-without-spaces”
(Note: you do not need to enter spaces or colons or anything else in the serial number.) - Optionally, validate the private key by running: certutil -store my
(Note: see the sample screen shot that shows the key container line is now present.) - Reboot the web server.
I tried stopping and starting web services, but this did not make the website work. I had to reboot the web server. Here is the link to the Microsoft website: http://support.microsoft.com/kb/889651 for your reference.