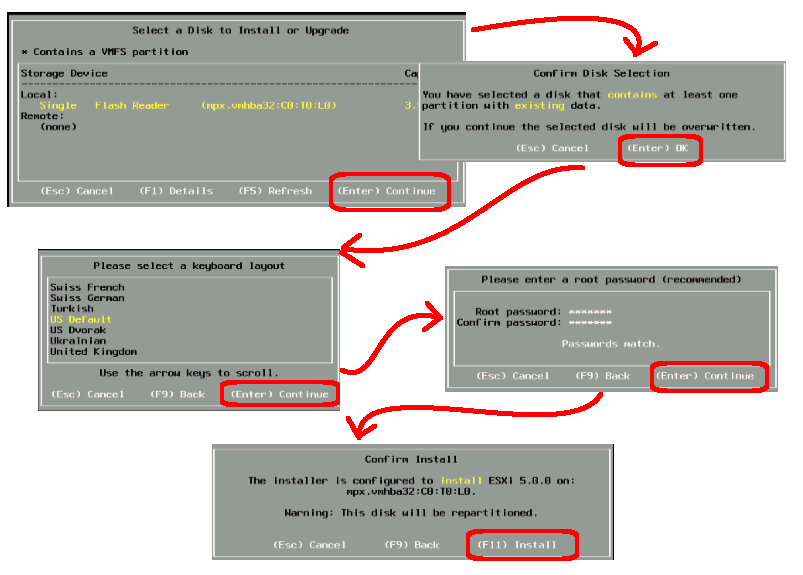
I needed to install ESXi 5.0 on a new HP blade server. I downloaded the ESXi ISO image from VMware, but it did not work! Turns out that HP has a OEM version of the ESXi image, with the necessary ethernet Flex-NIC drivers already bundled. So, I downloaded the HP OEM ESXi 5.0 image, installed it on the blade server, and it worked flawlessly!
The correct image for HP blade servers is called 5.0_Oct_2011_ESXi_HD-USB-SDImageInstlr_Z7550-00253.iso and can be downloaded from the following link. You will need to setup a login to receive the download:
https://h20392.www2.hp.com/portal/swdepot/displayProductInfo.do?productNumber=HPVM09
- Connect DVD player to host and power on machine:
- Using HP servers, you need to connect to the iLO console. If your not using HP, use an approptiate equivalent.
- Connect the DVD ISO image to the host machine’s DVD.
(More detail: Within the HP iLO, click the Virtual Drives menu | click the Image File CD-ROM/DVD checkbox.)
(Even more detail: Browse to the locally saved HP ESXi ISO image and click the Open button.) - Once the DVD is connected, power on the host machine.
(More deatil: On the HP iLO, Select the Power Switch menu | Momentary Press menu item.)
(Note: By default, the HP BIOS boots from DVD first. If this does not work, alter the BIOS to boot from DVD.)
- Acknowledge license agreement and install ESXi operating system:
- The “Welcome to VMware ESXi 5.0.0 Installation” screen presents itself.
- Click the
button to continue. - Click the F11 button to accept the license agreement.
- The “Select a Disk to Install or Upgrade” screen presents itself.
- Press the
key to continue. - Press the
key to confirm the overwrite. - Press the
key to confirm a US Default keyboard. - Enter the root password twice, and press the
key. - Press the F11 button to confirm the installation should proceed.
- Disconnect DVD player and reboot machine:
- The “Installation Complete” screen presents itself.
- Disconnect the DVD ISO from the host machine.
(More detail: In HP iLO, select the Virtual Drives menu | uncheck the Image File CD-ROM/DVD checkbox.) - Back on the VMware screen, press the
key to reboot.
- Assign IP address, DNS, and host name:
- Once the host has rebooted, the VMware grey/yellow welcome screen presents itself.
- Press the F2 button to customize the system.
- Enter the host credentials you setup during installation and hit the
button. - The “System Customization” screen presents itself.
- Use the arrow keys to highlight “Configure Management Network” and hit the
button.
(Note: the mouse will not function because there is no mouse driver for ESXi.)
(Another note: if the screen display darkens, click the space bar to reactivate it.) - The “Configure Management Network” screen presents itself.
- Highlight “IP Configuration” and click the
button.
(Note: Adapter vmnic0 defaults to being assigned to the management network, which is generally correct.) - Use the down arrow to highlight “Set Static IP…” checkbox and click the spacebar.
- Use the down arrow to highlight “IP Address” field, click backspace, enter IP.
- Use the down arrow to highlight “Subnet Mask” field, click backspace, enter mask.
- Use the down arrow to highlight “Default Gateway” field, click backspace, enter gateway.
- Hit the
key to save changes. - You will be back viewing the “Configure Management Network” screen.
- Use the down arrow to highlight “DNS Configuration” and click the
button. - Enter the first DNS server IP address.
- Enter the second DNS server IP address.
- Enter the fully qualified host name.
- Hit the
key to save changes. - You will be back viewing the “Configure Management Network” screen.
- Click the
button to exit and save your changes. - Press the “Y” key to acknowledge the save request.
- Validate management network:
- You will be back viewing the “System Configuration” screen.
- Using the arrow keys, highlight “Test Management Network” menu item.
- Hit the
key to enter the test screen. - Hit the
key to initiate the test. - Hit the
key to confirm the test ran successfully.
(Note: if something fails, you may have made a typo or your network equipment may be setup incorrectly.) - Hit the
key to exit the test results screen. - You will be back viewing the “System Configuration” screen.
- Press the
key to logout.
Now, you can use the vSphere 5.0 client to connect to the host server, define storage, setup networking, create virtual machines, ect.
