Yesterday, I needed to extend some 2008R2 drives that were used by Exchange mailboxes. As I went through this process, I remembered blogging previously about extending volumes in Server 2003. See this post: https://www.orionscache.com/2012/01/extending-the-windows-system-drive/. I realized those steps don’t exactly apply, and I had a couple of emails asking me to be more specific with regards to Server 2008. Here was my opportunity to document the steps!
- First, extend the hard disk in VMware:
- Run the vSphere client or login to the web client
- Highlight the virtual machine needing to be increased
- Goto the summary tab | click the “Edit Settings” link
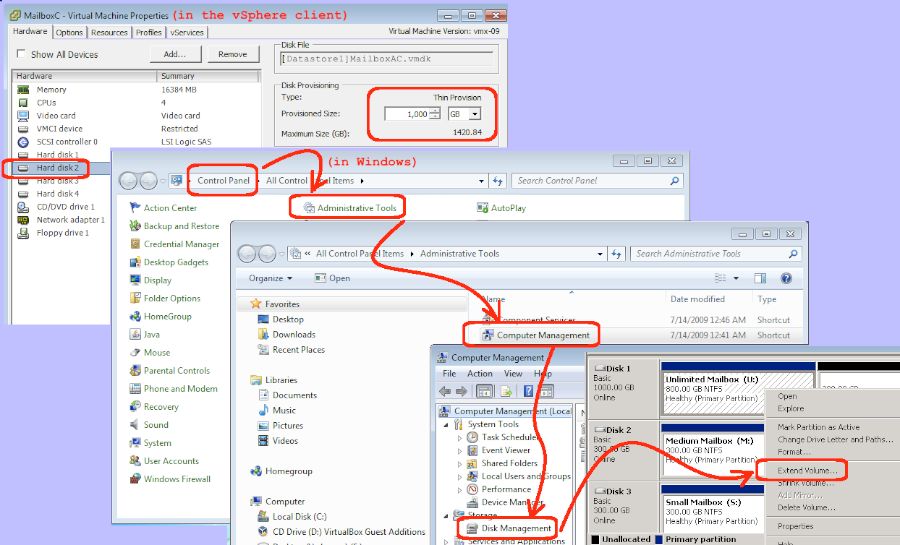
- Goto the Hardware tab
- Highlight the hard disk (left) and increase the provisioned size (right)
(Note: if the ability to change the size is greyed out, you are using a configuration that does not support dynamic changes.)
- Second, make the corresponding change in Windows:
- Open a console window to the virtual machine being increased
- Login to the virtual machine with administrative rights
- Open Control Panel | Administrative Tools | Computer Management
- Click “Disk Management”
- A dialog box that includes a diagram of disks and their sizes popups…
- Highlight the disk to be increased | Right-click and select the “Extend volume…” menu item
Note that extending the volume with the machine running should be available if you are using iSCSI disks. If the capability to extend the volume is greyed out in vSphere, it means you must shutdown the guest before making the necessary change. Also, if you don’t see the new available space show up in “Disk Management”, you can force the refresh by doing these steps:
- Extend the disk from the DOS prompt:
- Open a DOS prompt using Run | CMD
- List volume (note: not plural).
==> Figure out which volume # is the drive letter you just assigned (note: the order varies). - Select volume #
- Extend (note: extends to the maximum available space)
- Exit (closes DiskPart)
- Exit (closes the DOS prompt)
If you have actually run out of space in your Exchange mailbox or logs, there are steps you will need to complete in order to re-mount the mailbox. In my case, I caught the low space warning before actually running out, so once I was done extending the volume, I could return the Exchange server to production. That evening, I went ahead and shutdown Exchange services nicely and then rebooted the Windows virtual machine, for good measure, although it was not strictly necessary.