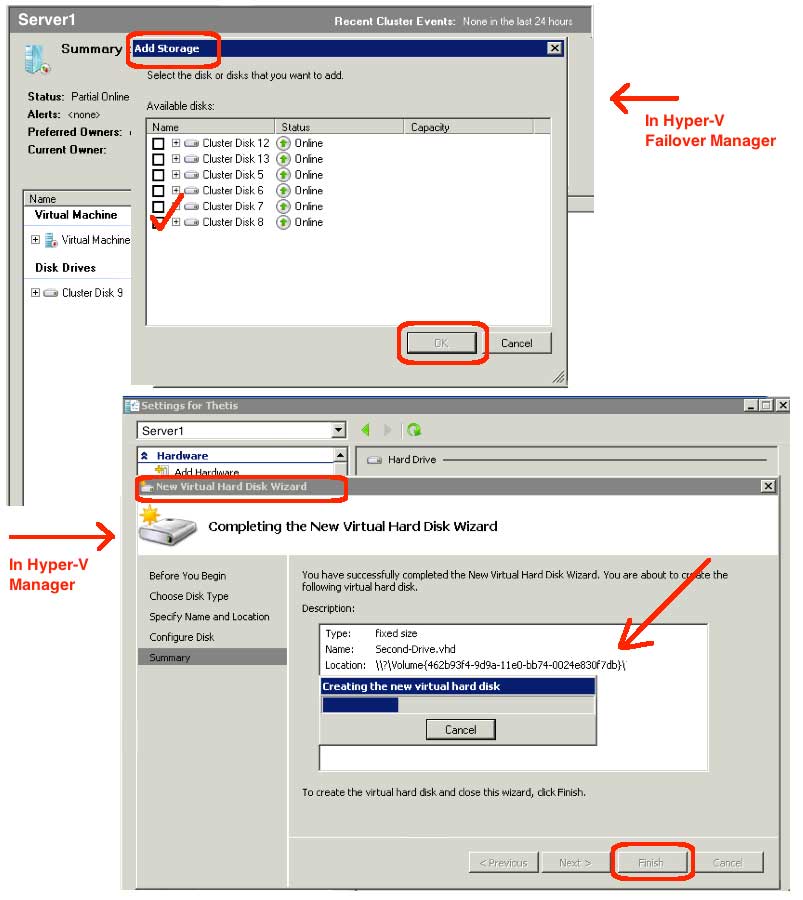
I needed to attach some storage to an existing Hyper-V guest operating system. The guest was running in an existing failover cluster. The storage was already provisioned such that it appeared in Failover Cluster Manager | Storage as “Available Storage”. Herein are the steps taken:
- Grab the storage path for later use.
- Start | Administrative Tools | Failover Cluster Manager.
- Expand Storage, and double-click an available storage item to available free space.
(Note: validate the available free space for later usage.) - Highlight the volume, right-click and select the Copy menu item.
(Note: best practice is to not assign a drive letter and instead use the \\?\Volume{xyz…} path.)
- Make the storage available within Failover Cluster Manager:
- Under Services and Applications, double-click the guest you want to augment.
- Within the Actions pane, click the Add Storage link.
- Check the appropriate checkboxes and click the OK button.
(Details: the new storage appears under Disk Drives.)
- Create the virtual disk using Hyper-V Manager:
- Within Failover Cluster Manager, assuming the guest is highlighted, click Manage Virtual Machine.
(Note: this opens Hyper-V Manager.) - Within Hyper-V Manager, highlight the guest machine, and click Settings within the Action pane.
- Start the wizard:
- If you do not have a SCSI adapter, use Add Hardware | SCSI Controller | Add button.
- If you already have a SCSI adapter, use SCSI Controller | Harddrive | Add button.
(Note: If the Add button is grey, you need to shutdown your virtual guest before editing.)
- Click the Next button.
- Select Fixed disk (for SQL or transaction servers) or you can thin provision the disk. Click the Next button.
- Name the new virtual drive and paste the path you saved in step 1 into location. Click the Next button.
(Note: location must have a trailing slash “\”.)
(Another note: I prefer not to embed spaces in the volume name.) - Define the disk space, make certain its less than the available space from step 1.
- Click the Finish button.
- Click the OK button to save changes to your virtual machine.
- Start the virtual guest and then close the Hyper-V Manager.
- Within Failover Cluster Manager, assuming the guest is highlighted, click Manage Virtual Machine.
The additional disk space has now been allocated to the virtual machine.
